
PLEASE NOTE: This is NOT one of my original tutorials. But someone on Craftster was asking about how to make this and I remembered seeing instructions for this on a site called Greyhound Manor. The site was a goldmine in DIY dog projects! Unfortunately, when I went searching for the site, it was no longer around and the domain was up for sale again so they had no intention of putting it back up. I decided to post it here so people can find it. The instructions are posted entirely as they were, minus a photo which, for some reason, I just don't have. It DOES include the original permission to copy this, for the good of dogs! My notes are at the very bottom.
Dog show and agility people have been using metal exercise pens for years. Problem is that the commercial ones are expensive. For about one half of the price of a commercial, metal exercise pen, you can construct this PVC exercise pen, which ends up being slightly bigger.
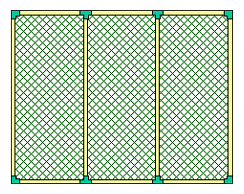
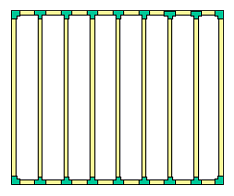
Each exercise pen consists of 6 panels. We give instructions for two basic panels: the fishnet panel and the barred panel. The fishnet panels are lighter, cheaper to make and give more complete coverage from prying hands that may want to pet the hounds. The barred panels are sturdier, heavier and easier to keep clean.
Materials Needed for 6 Fishnet Panels:
Materials Needed for 6 Barred Panels:
We found the necessary parts at a home store (like Home Depot or Hechingers), but a plumbing supply place may be less expensive. The 10-foot sections of PVC cost around $1.30 each. The Ts and elbows were $0.15 - $0.40 each. We found the contractor packs of 10 to be one half the price of buying the pieces individually.
For the fishnet panels, we found a 10-foot by 10-foot decorative fishnet at an army surplus store. Alternatively, any mesh will work. Heck, you could even macrame or weave your own netting on the frame with thin rope or cord.
Your job will be much easier if all your pieces are exactly the same size. A radial arm saw or power miter saw works great for cutting PVC, especially with a stop-block to ensure all the pieces are the same size. The hand-held PVC cutters also work well, but will be considerably more work.
Construct the PVC panels as shown in the diagrams below to ensure you have all the necessary parts for the 6 panels. We found that attaching the fittings to all of the 36-inch sections first was best. Then attach the 36-inch sections into panels using the shorter pieces. Cut extra pieces as necessary. When you're sure you have all the necessary parts, take everything apart again.
You CANNOT skip this step. You must use the special PVC cleaner to prepare the PVC to take the glue. It comes in a metal can with a brush attached to the lid. IN A WELL-VENTILATED AREA, clean about 1 inch of each end of each piece of PVC. Also clean the inside of each elbow and T.
PVC glue dries VERY quickly. You have under 20 seconds to position the fitting on the pipe. You won't be able to twist after that, so be certain that your fittings are proper aligned. The safest way we found to proceed was to glue the fittings to the ends of all the 36-inch sections first, being careful to make sure the fittings on each end pointed the same way. Then go back and glue in the smaller pieces to make each panel.
Lay the completed panel over the fishnet and cut to the proper size. Tie a cord to the frame and weave through the edges of the fishnet and over the frame to stretch and attach the net. This can take some time. Be patient with it. Alternatively, tie rope or cord to frame and macrame the netting yourself.
Use three plastic cable ties (or wire) to connect each of the panels to the next. Do not make the last connect to complete the circle. This will be your door. Attach a few cords or extra pieces of wire where this last connection would be made so that you will be able to secure the door in the field.
Position the panels into a circle. Optionally, use tent stakes to secure the pen into the ground. Or, use sandbags to secure the pen on a hard surface. Add blankets or pillows as you'd like. Another good idea is to use one of those outdoor canopies or market umbrellas to provide shade for your hounds.
Feel free to print, copy and distribute these instructions as you'd like. You can print all or part of them in newsletters or whatever. You can change them as you'd like or reformat them so they're easier to reproduce. We would prefer the courtesy of a credit if you do reprint them, but it's not essential.
We encourage you to use these patterns to help your local greyhound adoption group. Donate a few to your local group. You'll feel good about yourself and you'll be helping the hounds.