k
k
Page Updated: 4.17.08
k
Page Updated: 4.17.08
My ParasolDate started: 09/09/05
I am going to a wedding at the Ren faire in Oct and I need something to keep the sun off me. I don't do "sun" very well. I searched online for instructions on making a parasol and found nothing. So here is what I did.
Materials Cost Breakdown
|
|

When I finish it, I will post a picture here. |
|
|
Making the pattern. |
First I made a pattern. I love the True Grid pattern drafting cloth and use a lot of it. That is what I am using here. It is similar to interfacing and has a blue grid printed on the cloth. I just opened the umbrella and placed the cloth over it, pinned it in place and cut a pattern. |
|
Cutting out lace. |
Using the pattern piece I just made- I cut out 8 pieces since this umbrella has 8 sections. |
|
Sewing diagram coming soon! |
Sew the sections together. I used a basting stitch for this because a smaller stitch would have just tangled. |
|
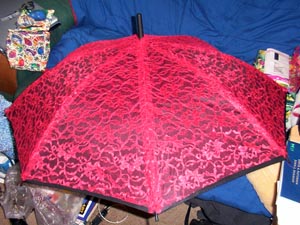
Stitching lace overlay. |
I handstitched the lace to the umbrella. This took a while. You can see that the bottom pulls up in some places so the next time I will cut it longer on the bottom. I would rather have enough and have to trim it than have too little, but I was close enough here and it worked. I used a curved needle to do the stitching and I don't think a straight would really work well. I highly recommend using curved needles for this project. I stitched from the top of each spine to the tip, tying it every 3 or 4 inches or so. I didn't whip stitch the entire thing as I didn't feel I needed to do that. I also didn't stitch it in between the spines as I will be sewing lace on and the lace will get sewn through then. |
|
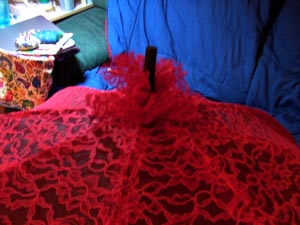
Top ruffle. |
Next I made the top ruffle. The flat lace I had, has scalloped edges and so I cut a piece from the edge to about 5 inches and I cut the strip 1 yd long. I stitched down the center of the strip, lengthwise, using a long basting stitch then gathered it. I place this on the top and tied off my gathering stitches so they would not come undone. Then I stitched this down to the spine in two places. |
|
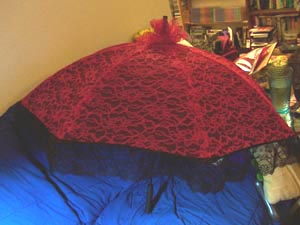
Sewing black edge lace. |
Then I took the wide lace trim and hand sewed that on using the curved needle again. I tacked it down to the spines and then tacked it in two places in each section and then ran a running stitch all the way around using small stitches. Time invested so far: about 6 hours I am so happy with how it is looking so far and it is far from finished. |
|
Adding blk lace. |
I added the black lace around the middle. |
|
Detail of top. |
I had a small bit of lace left over from the bottom so I took that, scrunched it up and added it underneath the top ruffle for some contrast. Time invested so far: about 8 hours I have deemed it done enough for the wedding and will work on *other* projects I must finish for Cynthia's wedding. If I have time, I can come back to this. I still want to get some more of the flat red lace and add a ruffle just above the bottom one. |